Kitchen Renovation Before and After: Ideas, Costs and Tips
If your kitchen feels cramped, dated, or just a bit awkward to use, you do not need a full knockdown to make it better. In this guide, you will learn practical kitchen renovation ideas you can actually use, from quick upgrades to smart layout tweaks that add value to your property.
Here is the honest expectation. The biggest before-and-after moments usually come from fixing three things first: flow, light, and storage. Get those right and even a modest refresh can feel like a brand new kitchen.
Save the ideas that suit your space as you go, because you will not use every tip. There is a simple plan at the end to help you prioritise what to do first and what can wait.
Why These Makeovers Look so Different After
The biggest transformations happen when the layout works better, not just when finishes change. Use the sections below to spot what drives a strong kitchen renovation before and after, so you know what to fix first.
The 5 Upgrade Levers that Change the Whole Room
These five upgrade levers are what make a kitchen look and feel completely different. Get them right, and the room works better before you choose any finishes.
Layout and Traffic Flow
When people can move past each other without the awkward shuffle, the whole room feels bigger. Flow is the invisible upgrade that makes the “after” look calm.
Storage That Removes Bench Clutter
The best “after” kitchens do not have better families; they have better storage. When everyday items have a home, the benches stay clear and the room looks finished.
Lighting, Both Task and Ambient
Good lighting makes materials look more expensive than they are. It also stops you chopping onions in your own shadow.
Cohesive Finishes and Colours
When undertones match and the metals play nicely together, the kitchen looks intentional. That’s the difference between “new” and “new and polished.”
Better Zones for Cooking and Gathering
A kitchen is not one activity. It is prep, cooking, cleaning, coffee-making, and someone hovering asking what’s for dinner.
How to “read” a Before Photo Like a Designer
A before photo can tell you more than you think. It shows what is working, what is annoying, and what is being wasted.
Note Pinch Points Near the Cooktop and Sink
Look for places where two people cannot pass without bumping elbows. If the cooktop, sink, and fridge sit too close, cooking turns into a traffic jam.
Spot Wasted Corners and Dead Bench Space
Check corners where cabinets are hard to reach and items disappear into the back. Notice benches that look generous but do not actually hold prep tools or appliances well.
Check the Sightlines into Living Areas
Stand where the photo was taken and notice what your eyes land on first. If you see clutter, a messy sink, or a fridge end panel, that is a visual problem worth fixing.
Identify the Darkest Spots and Why
Look for shadows over the sink, cooktop, or prep zone, because these are the places you need light most. Darkness usually comes from blocked windows, poor downlight placement, or no task lighting under cabinets.
Budget Choices that Deliver the Biggest Visual Payoff
A kitchen can look brand-new without a brand-new budget if you spend in the right spots. This section shows what to keep, what to upgrade, and how to split your budget without regrets.
Keep What You Can, Spend Where it Shows
If the budget is tight, keep plumbing and electrical where they are and spend on what you see every day, like benchtops, splashbacks, lighting, and hardware. For a single “wow” moment, pick one hero feature, such as a statement rangehood, bold splashback, or an island that anchors the room.
A common strategy is a “pull and replace” refresh. Keep the layout and services, then upgrade materials and finishes so the kitchen looks completely different without a full rework.
A Simple Budget Split Homeowners Can Use
Here are the budget moves that give you the most visual impact for your spend in a kitchen renovation. They focus on what you see first, and what you touch every day.
Cabinetry and Joinery
This is where your storage and layout either work hard or fall over. Spend here if you need better function, not just a prettier door style.
Appliances
Choose appliances based on how you cook, not on what looks fancy in a catalogue. Prioritize the pieces you use daily, then keep the rest sensible.
Benchtops and Splashbacks
These are the surfaces you see up close every day, so they do a lot of visual heavy lifting. One strong choice here can make the whole kitchen feel higher-end.
Flooring
Flooring connects the kitchen to the rest of the home, so mismatched finishes can make the space feel chopped up. Pick something durable that suits your traffic and cleaning habits.
Lighting and Electrical
Good lighting improves both function and mood, and it makes finishes look better. Plan power points early so you are not relying on power boards and extension cords later.
Plumbing Fixtures
A quality sink and tap can lift the kitchen fast, and they affect daily use more than you think. Choose fixtures that are easy to clean and suit how you wash, rinse, and prep.
Paint and Finishing Touches
This is where the room goes from “nearly done” to “actually finished.” Small upgrades like handles, trim details, and paint can make the whole kitchen feel sharper.
Contingency
Renovations love surprises once things get opened up. A buffer keeps your kitchen renovations before and after on track, so small hiccups do not blow the budget.
Layout Fixes that Change Daily Life
Layout changes are where the real comfort comes from. Get the movement right and the whole kitchen feels calmer.
Remove Barriers that Block Movement
Peninsulas often create a bottleneck, especially near the fridge or sink. Open up the main walkway and the kitchen can feel bigger without adding a single square metre.
Plan the Work Zones, Then Plan the Social Zone
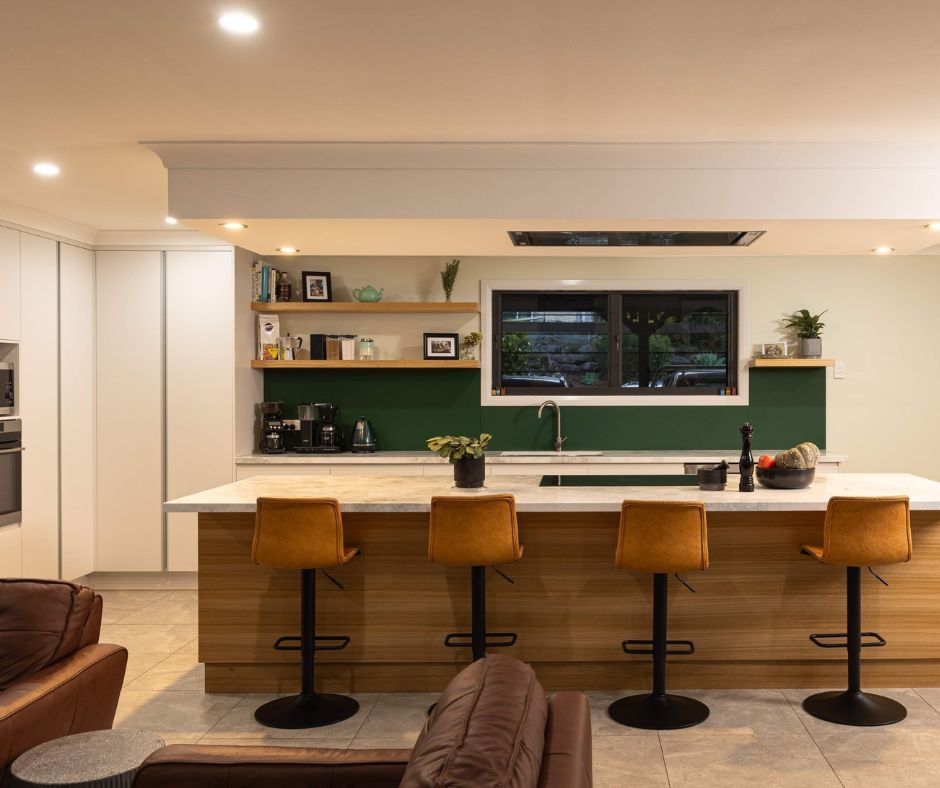
Set up prep near the sink, bins, and the most-used drawers so your steps stay short. Then place coffee, snacks, and seating where people can hover without crowding the cook or blocking the dishwasher.
Island or Peninsula: How to Choose
Choose an island if your kitchen has enough room for clear walkways on all sides. Pick a peninsula if space is tighter, but you still want extra bench space, seating, and practical storage like drawers on the working side.
Storage Upgrades That Make the “after” Look Calmer
Storage is what makes the after photo look tidy, even on a normal weekday. When everything has a home, benches stay clear and the room feels lighter.
Go Tall, Then Add Smart Internals
Full-height cabinets reduce visual clutter by leaving less on display. Add pull-out pantries, bin drawers, and corner units, then size the cabinetry to your room so it feels built-in rather than squeezed.
Designers often maximise storage with custom cabinetry and smart accessories, especially in small kitchens.
Hide the Mess With an Appliance Garage
An appliance garage keeps the daily mess out of sight while staying easy to access. Use pocket or roller doors and park the toaster, air fryer, and coffee gear inside so you can keep one bench clear for prep.
Some renovations use tall cabinets with pocket doors to hide small appliances and keep benches clear.
Open Shelving, When It Works
Open shelves can lighten a wall and stop the kitchen feeling boxed in. Keep it to one section and style it with matching items only, otherwise it turns into visual noise fast.
Examples show shelving used to open up the room and improve display and access.
Finishes That Make the Renovation Feel “New”
Finishes are the part you notice first when you walk in. Choose them well and the whole kitchen feels fresh, even if the layout stays similar.
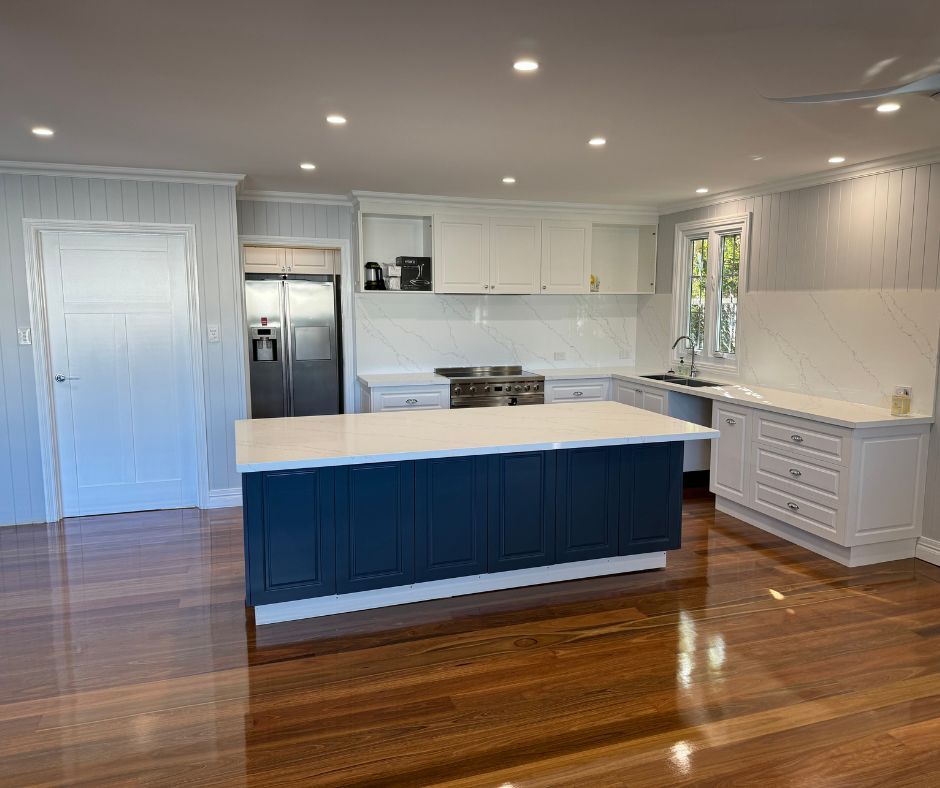
Cabinet Colour and Contrast
Light cabinet colours lift the room and make it feel more open. Two-tone cabinetry can add depth, as long as undertones match across cabinets, benchtops, and flooring.
Benchtops and Splashbacks That Earn Their Cost
Pick one hero surface and keep the rest simple so it looks intentional. Full-height splashbacks in key areas look sharp and make cleaning easier, especially behind the cooktop.
Lighting That Changes the Mood
Layer lighting with downlights, pendants, and under-cabinet strips so you get both function and atmosphere. Use warm white for a welcoming feel, and add lights inside the pantry and appliance cupboards for everyday convenience.
Kitchen Renovation Ideas Before and After
Before and after kitchen renovations results come from a handful of smart choices, not a hundred tiny ones. Use these ideas as a checklist, then pick the few that suit your space and budget.
Swap Bulky Uppers for One Open Section to Add “Airiness”
Remove one run of heavy overheads to create breathing room. Keep it small so you still have proper storage.
Add a Pantry Wall for Storage and a Cleaner Look
A pantry wall clears benches fast because more items live behind doors. It also makes the kitchen look cleaner and more built-in.
Replace a Dated Peninsula With an Island that Fits the walkway
An island can improve flow if you have clear walkways around it. It also adds prep space and makes the kitchen feel more social.
Add a Breakfast Nook if You Have an Unused Corner
An unused corner can become a practical eating spot. It is great for quick meals without clogging the main work area.
Introduce a Coffee Bar to Reduce Bench Clutter
A coffee station keeps mugs, pods, and appliances out of the prep zone. It also reduces morning traffic around the cook.
Use Handleless Cabinetry for a Modern Finish
Handleless doors create a clean, modern look. They also make lines feel longer, which helps small kitchens feel bigger.
Add a Feature Rangehood or Statement Splashback
Pick one hero element to create a focal point. Keep surrounding finishes simple so it looks intentional.
Extend Cabinets to the Ceiling to Reduce Dust on Shelves
Ceiling-height cabinets remove the dusty gap and add storage. They also make the kitchen feel taller and more finished.
Use Deep Drawers Instead of Lower Cupboards
Deep drawers are easier to access and organize. You can see everything without digging to the back.
Add Power Points Inside Cabinets for Charging and Appliances
Hidden power keeps benches clear and reduces cords everywhere. It is perfect for charging appliances and a tidy coffee zone.
Upgrade Tapware and Sink for Instant Lift
New tapware and a better sink deliver a quick visual lift. You also feel the upgrade every single day.
Replace Flooring for a Whole-Room Change
New flooring can change the whole room’s tone instantly. Choose something durable that suits your cleaning routine.
Add a Window or Skylight if the Room is Dark
Natural light makes the space feel larger and more welcoming. It also makes finishes and colors look better.
Use a Consistent Metal Finish for Hardware and Fittings
Matching metals across handles, tapware, and lights looks polished. It stops the kitchen from feeling like a mix of leftovers.
Add Seating That Suits How Your Household Actually Eats
Choose seating based on how you actually eat and gather. Make sure it does not block drawers, the dishwasher, or walkways.
Before and After Kitchen Renovations
Most kitchen renovations before and after results look impressive for the same reasons, and it is not just a new splashback. This section covers what works and gives you a quick checklist to spot what your kitchen needs most.
The Patterns That Show Up in the Best Results
The best before-and-after kitchens tend to follow the same playbook. Better flow beats adding more “stuff,” hidden storage makes the space look bigger, and natural light can change the whole mood of the room.
The strongest results also keep things simple. One hero feature is usually enough, and finishes feel more luxe when they are consistent across colors, undertones, and hardware.
Quick Self-Audit Checklist
Use this quick self-audit to pinpoint what is actually not working in your kitchen right now. It is a fast way to turn vague frustration into clear renovation priorities.
Ask yourself what slows you down when cooking, where clutter lands every day, what you wish you could see from the sink, and where guests naturally stand. Then choose the one change that would help most, because that is usually your best starting point.
A Step-by-Step Plan Homeowners Can Follow
A good kitchen renovation comes down to the right decisions in the right order. Follow these four steps to keep your before-and-after kitchen renovations on track and avoid rework.
Step 1: Define the Brief
Work out who uses the kitchen, when they use it, and what jobs it needs to handle. List what you hate, what must stay, and what you want to change so decisions stay focused.
Step 2: Measure and Map the Pain Points
Measure walkways, door swings, and appliance clearances so nothing clashes once drawers and doors open. Note power and lighting points early, because they affect what is easy to change and what becomes expensive.
Step 3: Lock Your Scope and Timeline
Decide whether you are changing the layout or refreshing finishes, because that drives cost, time, and disruption. Confirm lead times for cabinetry, stone, and appliances early to avoid delays.
Step 4: Finalise Selections and Sequence
Finalise cabinetry and joinery first, then lock in appliances before cabinet drawings are finished. Confirm benchtops and splashbacks next, then the lighting plan, flooring, and paint so the job runs in the right order.
Mistakes That Ruin the “after” Photo
Before you lock in finishes, check this list of common slip-ups that can undo all the hard work. These are the mistakes that make a kitchen look great in photos but then feel frustrating to use every day.
Choosing Style Before Function
A pretty layout that is awkward to use will annoy you daily. Fix flow and work zones first, then pick finishes.
Not Planning Storage for Real Items
If your appliances, bins, and pantry staples have no home, the clutter returns fast. Design storage around what you actually own and use.
Under-Lighting the Benches
One ceiling light will not cut it for prep and cooking. Add task lighting so benches are bright and shadows do not win.
Skipping Ventilation
Poor extraction leaves smells, steam, and grease behind. Good ventilation protects finishes and keeps the room comfortable.
Ignoring Lead Times and Delivery Access
Cabinetry, stone, and appliances can take weeks, and delays compound quickly. Check access and timing early so install day is not a scramble.
Forgetting PowerPoint Where You Need Them
Not enough power means cords everywhere and daily frustration. Plan outlets for prep zones, appliances, charging, and any appliance garage.
Wrap Up and Plan Your Kitchen Renovation With Alps Constructions
The best kitchen before and after results rarely come from one fancy finish. They come from getting the basics right, especially flow, light, and storage.
Your next step is simple. Take clear photos, grab a few key measurements, and write a short brief on what is not working and what you want to change.
If you want help turning those ideas into a clean plan and a realistic scope, Alps Constructions can help with bathroom renovations, kitchen renovations, and additions and extensions. Save the checklist, shortlist your top three ideas, then contact us to talk through your space and next steps.
Key Takeaways
If the budget is tight, keep services in place and upgrade what you see every day, like benchtops, splashbacks, lighting, and hardware. These kitchen renovation ideas work best when you fix traffic flow first too, because peninsulas and walls often cause the biggest headaches, and removing barriers can make the kitchen feel bigger straight away.
For a calmer “after,” go tall with storage and add hidden zones for appliances so benches stay clear. Use open shelving in small doses for lightness, then finish strong with layered lighting that improves both function and mood, day and night.
FAQs
1. What is the cheapest way to refresh a kitchen without a full reno?
- Paint the walls, swap handles, and update tapware for quick impact. Add better lighting and a new splashback if the budget allows.
2. How long does a typical kitchen renovation take from start to finish?
- Most projects take 6 to 12 weeks from planning to completion. Custom cabinetry and layout changes can push it longer.
3. Should I keep the same layout or change it for better flow?
- Keep the layout if it already works and the budget is tight. Change it if you have bottlenecks near the sink, cooktop, or fridge.
4. What upgrades make a kitchen look more expensive?
- Good lighting and quality hardware instantly lift the finish. A standout benchtop and clean splashback make a big difference.
5. Is it worth painting cabinets, or should I replace them?
- Paint them if the cabinet boxes are solid and doors are in good shape. Replace them if they are warped, damaged, or the storage is poor.
6. How do I choose the right island size for my space?
- Aim for at least 900 mm clearance on all working sides. Keep it smaller if it blocks drawers, the dishwasher, or walkways.
7. What storage features are most worth paying for?
- Deep drawers are the best value for daily use and easy access. Pull-out pantry shelves and a bin drawer also save time and mess.
8. Can I renovate a kitchen in stages to spread the cost?
- Yes, you can start with paint, hardware, and lighting first. Plan the final layout early so you do not pay for rework later.
9. What lighting do I need for a functional kitchen?
- Use layered lighting with ceiling lights plus under-cabinet task lighting. Add pendants over an island for both light and style.
10. What should I do first, benchtops, cabinets, or flooring?
- Start with cabinets because they set the layout and measurements. Benchtops come after cabinets, and flooring depends on the install method.